
Network Engineering Lab Notes
A five-day Red Hat lab log covering local YUM repositories, DHCP, relay routing, DNS, Apache, and FTP services.
Contents20 sections
These are my step-by-step notes from a five-day network engineering lab. I usually wrote them after returning to the dorm, so the explanations follow the order in which I completed each exercise.
Historical note: this lab used Red Hat Enterprise Linux 8.2 in 2021. Package versions, security defaults, and recommended administration practices may differ on current systems. Commands that disable SELinux or the firewall are reproduced from the isolated classroom environment and should not be copied into production without a proper security policy.
Day 1: local software repositories
1. Install the virtual machine
Create a Red Hat virtual machine and name it server.
2. Configure a local YUM repository
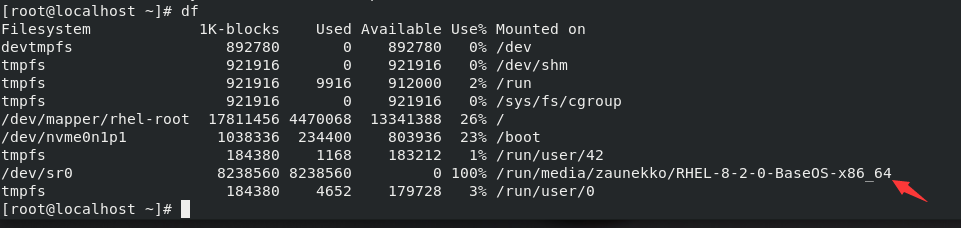
First, locate the mounted installation media:
df
The mount path may differ between machines. Copy the path shown on your system, then create the repository definition:
cd /etc/yum.repos.d/
vim myrepos.repo

[app]
name = app
enabled = 1
gpgcheck = 0
baseurl = file:///run/media/zaunekko/RHEL-8-2-0-BaseOS-x86_64/AppStream

[base]
name = base
enabled = 1
gpgcheck = 0
baseurl = file:///run/media/zaunekko/RHEL-8-2-0-BaseOS-x86_64/BaseOS
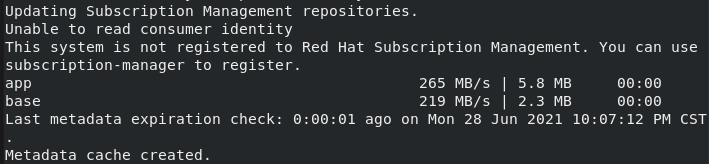
Replace both paths with the mount path from your own machine, then rebuild the cache:
yum makecache
3. Create a snapshot
Create a VM snapshot before continuing so this clean base can be restored for later exercises.
Day 2: DHCP server
1. Prepare two clients
Create two more Red Hat virtual machines named client1 and client2. Cloning is fine, but make sure their MAC addresses are different.
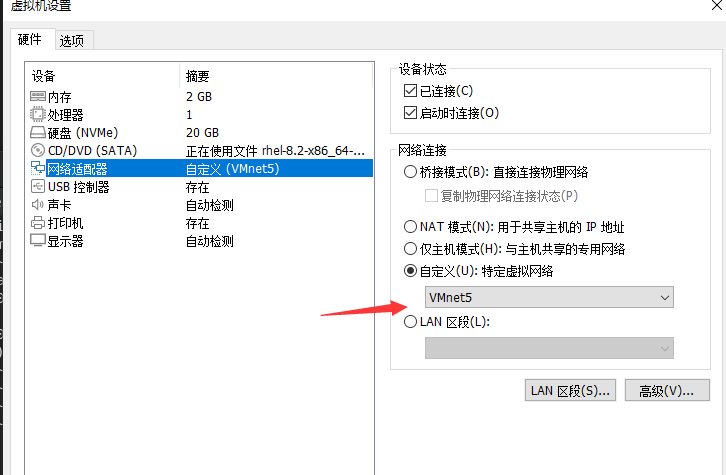
2. Configure the virtual network
Attach all three machines to the same custom virtual network. In this lab I used VMnet5; VMnet0, VMnet1, and VMnet8 were avoided because VMware commonly reserves them for bridged, host-only, and NAT networking.
3. Configure the server
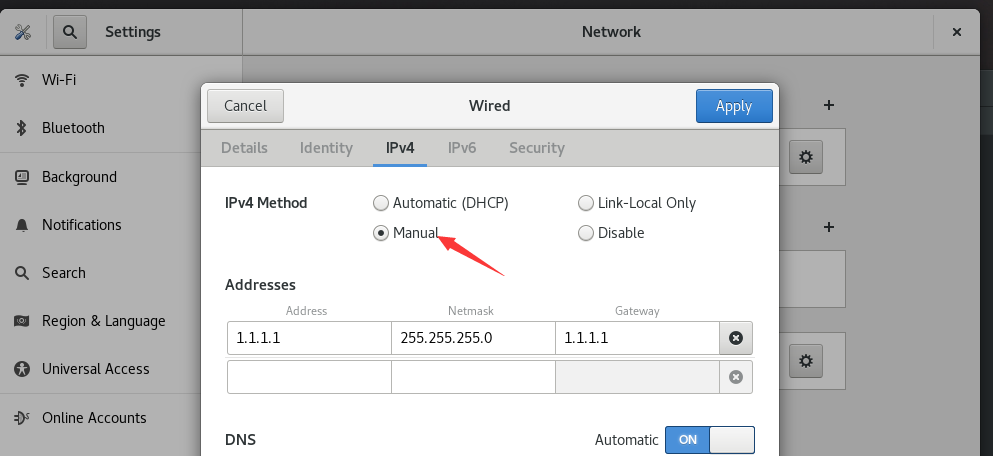
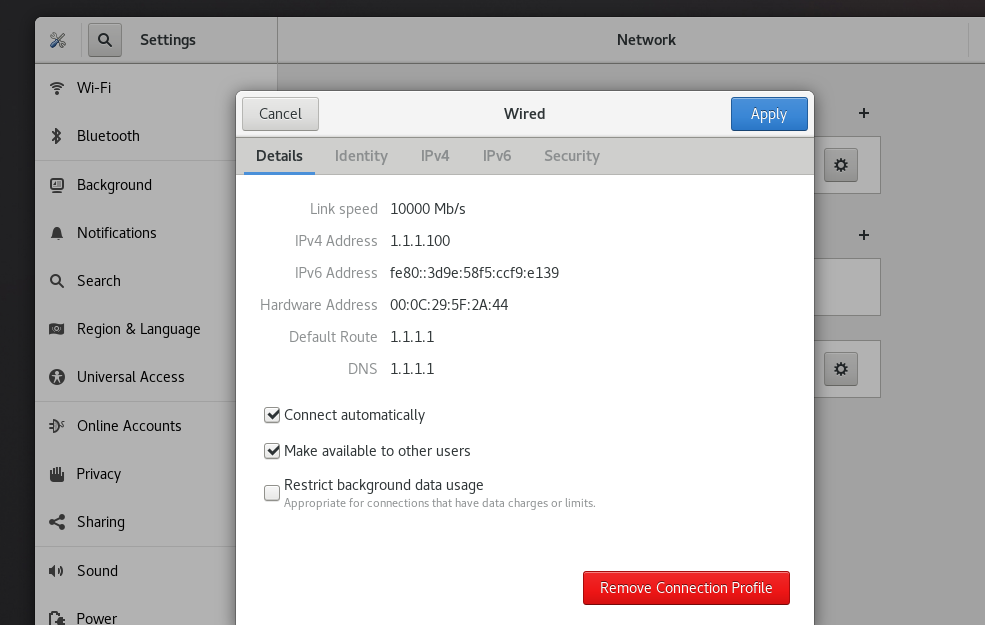
Set the server network configuration as shown below:
Install the DHCP service and copy its example configuration:
setenforce 0
systemctl stop firewalld.service
yum install dhcp-server.x86_64 -y
cp /usr/share/doc/dhcp-server/dhcpd.conf.example /etc/dhcp/dhcpd.conf
vim /etc/dhcp/dhcpd.conf
Remove or comment out the earlier sample subnet blocks, then add this subnet:
subnet 1.1.1.0 netmask 255.255.255.0 {
  range 1.1.1.2 1.1.1.3;
  option domain-name-servers 1.1.1.1;
  option domain-name "zaunekko.example.org";
  option routers 1.1.1.1;
  default-lease-time 600;
  max-lease-time 7200;
}
Restart the service:
systemctl restart dhcpd.service
4. Verify address assignment on the clients
Restore both clients to their snapshots and reconnect their wired interfaces. They should receive 1.1.1.2 and 1.1.1.3 from the server.
5. Assign a fixed address
The next requirement was to give the client currently using 1.1.1.3 the fixed address 1.1.1.100. Ping it first so its MAC address appears in the ARP cache:
# arp -a
? (1.1.1.3) at 00:0c:29:5f:2a:44 [ether] on ens160
? (1.1.1.2) at 00:0c:29:7c:aa:c9 [ether] on ens160
Add a host entry to /etc/dhcp/dhcpd.conf using the MAC address you found:
host fantasia {
  hardware ethernet 00:0c:29:5f:2a:44;
  fixed-address 1.1.1.100;
}
Restart DHCP again, reconnect the client, and confirm that it now receives 1.1.1.100.
Day 2 extra: add a DHCP relay
Move server and client1 to VMnet10, move client2 to VMnet15, and add a second adapter on client1 connected to VMnet15. client1 will route and relay DHCP traffic between the two networks.
1. Update the server
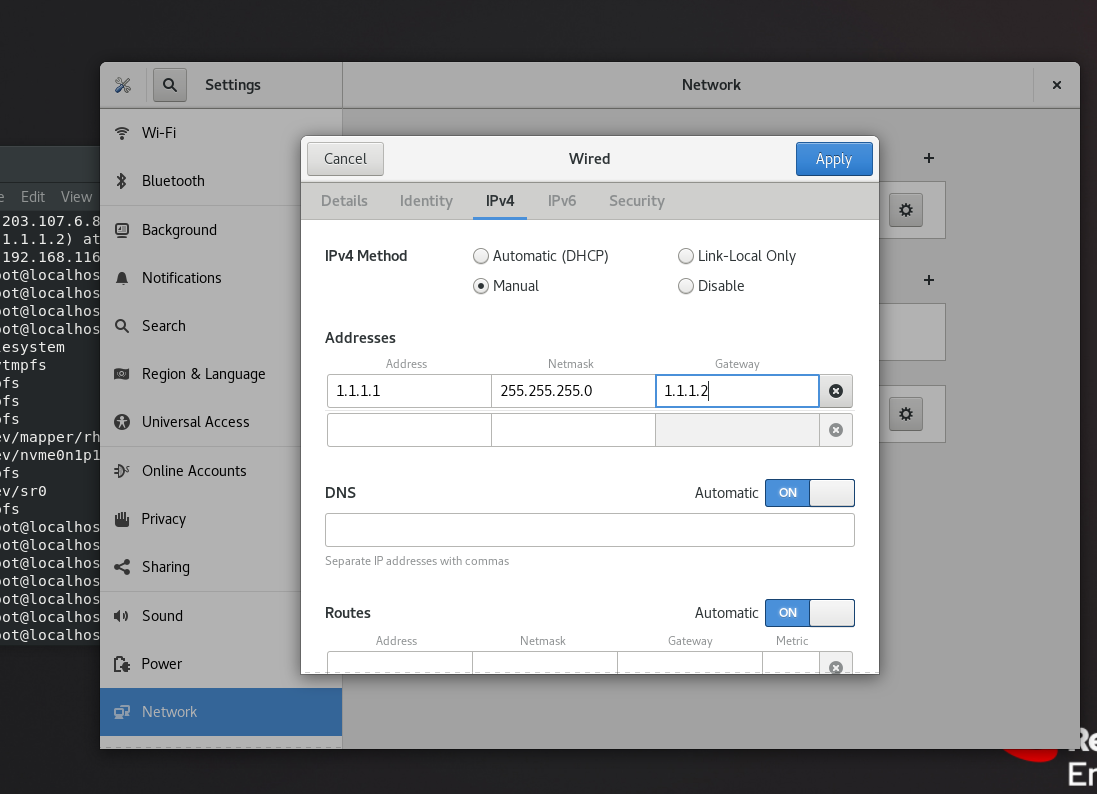
Use client1 as the server's gateway and define both subnets:
route add default gw 1.1.1.2
vim /etc/dhcp/dhcpd.conf
subnet 1.1.1.0 netmask 255.255.255.0 {
  range 1.1.1.2 1.1.1.3;
  option domain-name-servers 1.1.1.2;
  option domain-name "zaunekko.example.org";
  option routers 1.1.1.2;
  default-lease-time 600;
  max-lease-time 7200;
}

subnet 100.100.100.0 netmask 255.255.255.0 {
  range 100.100.100.2 100.100.100.3;
  option domain-name-servers 100.100.100.1;
  option domain-name "zaunekko.example.org";
  option routers 100.100.100.1;
  default-lease-time 600;
  max-lease-time 7200;
}
systemctl restart dhcpd.service
2. Configure the relay on client1
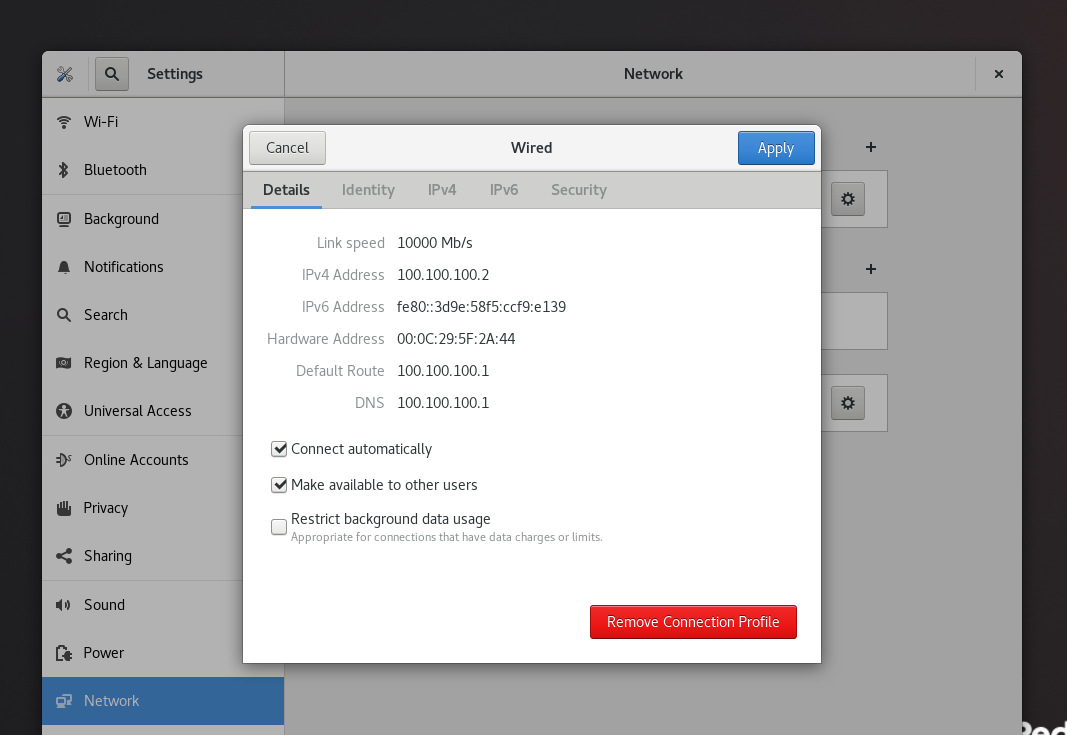
Reconnect the first interface, then enable and configure the second one:
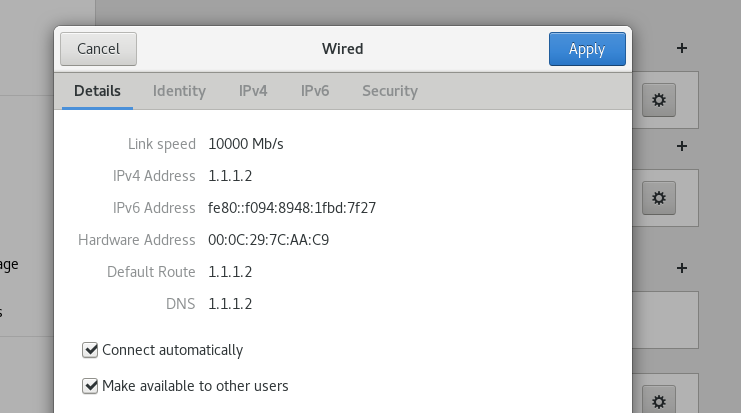
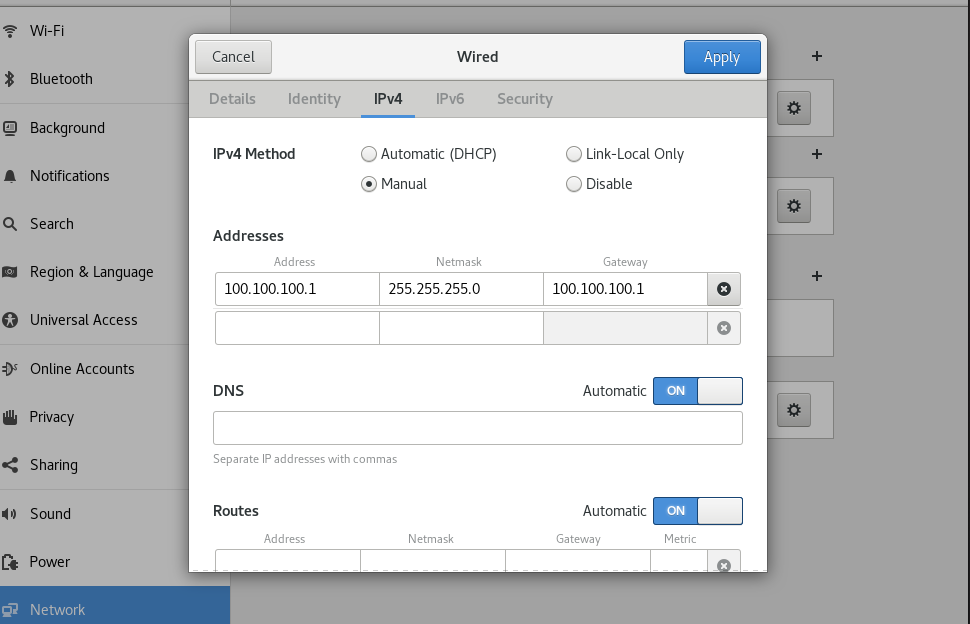

Enable IPv4 forwarding in /etc/sysctl.conf:
net.ipv4.ip_forward = 1
Apply it and install the relay service:
sysctl -p
cat /proc/sys/net/ipv4/ip_forward
yum install dhcp-relay.x86_64
cp /lib/systemd/system/dhcrelay.service /etc/systemd/system/
vim /etc/systemd/system/dhcrelay.service
Configure the service to forward requests from both interfaces to the DHCP server at 1.1.1.1:
[Unit]
Description=DHCP Relay Agent Daemon
Documentation=man:dhcrelay(8)
Wants=network-online.target
After=network-online.target

[Service]
Type=notify
ExecStart=/usr/sbin/dhcrelay -d --no-pid 1.1.1.1 -i ens160 -i ens224
StandardError=null

[Install]
WantedBy=multi-user.target
systemctl --system daemon-reload
systemctl restart dhcrelay.service
Reconnect client2 and confirm that it obtains an address through the relay.
Day 3: DNS with BIND
Set the server address and gateway to 192.168.1.1, then install BIND:
yum install bind.x86_64 -y
vim /etc/named.conf
named-checkconf /etc/named.conf
vim /etc/named.rfc1912.zones
Create and validate the forward and reverse zone files:
cd /var/named/
cp named.localhost shida.com.zone
vim shida.com.zone
named-checkzone shida.com /var/named/shida.com.zone

cp shida.com.zone 192.168.1.zone
vim 192.168.1.zone
named-checkzone 1.168.192.in-addr.arpa /var/named/192.168.1.zone
Start the service, make it persistent, and update the resolver configuration:
systemctl restart named.service
systemctl enable named.service
chmod +r /var/named/*
vim /etc/resolv.conf
Finally, use nslookup to verify forward records, aliases, and reverse lookup:
> syb.shida.com
Name:    syb.shida.com
Address: 192.168.1.1

> 192.168.1.1
1.1.168.192.in-addr.arpa name = syb.shida.com.

> www.shida.com
www.shida.com canonical name = station2.shida.com.
Name:    station2.shida.com
Address: 192.168.1.2
Day 4: Apache HTTP Server
Install Apache and create a basic home page:
yum install httpd.x86_64 -y
vim /etc/httpd/conf/httpd.conf
echo "welcome to gongyedaxue" >> /var/www/html/index.html
systemctl restart httpd.service
Create a second content directory and configure it as a virtual directory:
mkdir -p /gongye/yuyue
echo "my name is yuyue" >> /gongye/yuyue/index.html
vim /etc/httpd/conf.d/vdir.conf
Give the directory the SELinux context Apache expects, then restart the service:
semanage fcontext -a -t httpd_sys_content_t '/gongye(/.*)?'
restorecon -Rv /gongye/
systemctl restart httpd.service
Day 5: FTP with vsftpd
1. Configure anonymous access on the server
Install and enable vsftpd, then create a shared file:
yum install vsftpd.x86_64 -y
systemctl enable vsftpd.service --now
mkdir -p /ftp/share
echo "anonymous user" > /ftp/share/test.txt
vim /etc/vsftpd/vsftpd.conf
systemctl restart vsftpd.service
Apply the public-content SELinux context:
semanage fcontext -a -t public_content_t '/ftp/share(/.*)?'
restorecon -Rv /ftp/share/
2. Verify anonymous access from client1
Install the FTP client, connect as ftp, list the directory, and download the test file:
# yum install ftp.x86_64 -y
# ftp 192.168.1.1
Name: ftp
Password:
230 Login successful.
ftp> ls
-rw-r--r--  1 0 0  16 Jul 02 04:14 test.txt
ftp> get test.txt
226 Transfer complete.
ftp> exit
3. Configure a local FTP user
Create a local user and a file in that user's home directory:
useradd yuyue
echo redhat123 | passwd --stdin yuyue
su - yuyue
echo "welcome to gongyedaxue" >> yuyue.txt
Return to root, adjust /etc/vsftpd/vsftpd.conf, restart the service, and allow the required SELinux access for this lab:
systemctl restart vsftpd.service
getsebool -a | grep ftp
setsebool -P ftpd_full_access on
4. Verify local-user access
Connect from client1 as yuyue and download the file:
# ftp 192.168.1.1
Name: yuyue
Password:
230 Login successful.
ftp> ls
-rw-rw-r--  1 1001 1001  23 Jul 02 04:27 yuyue.txt
ftp> get yuyue.txt
226 Transfer complete.
ftp> exit
That completed the five-day lab: local repositories, DHCP and relay routing, DNS, Apache, and both anonymous and local-user FTP access.
Related posts
Discussion / approved
Comments
No comments yet.